If you are responsible for publishing content on an Amnesty WordPress Theme website, you will need to get set up with a user profile and have a WordPress induction from the Digital Content Coordinator. To do this, get in touch with the Website Operations team on [email protected].
This guide takes you through the first steps to getting started with using WordPress so that you can navigate around the WordPress back end and get ready to start publishing your content.
1. Logging In
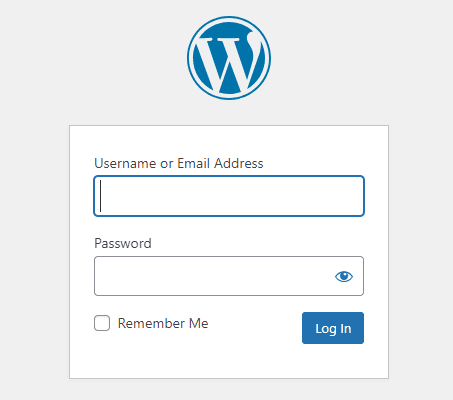
To log in to the WordPress back end of your website: add /wp-admin at the end of the website url. For example, to log in to www.amnesty.org you can visit www.amnesty.org/wp-admin.
You will need to use your email and password to log in.
If you need a new password, your website administrator can re-set your password for you, or you can click the Lost your password? link to reset it yourself.
Two factor authentication
All Amnesty WordPress Theme websites require you to use Two Factor Authentication when you log in. For most Amnesty WordPress Theme websites, this means using an authenticator app on your phone (for example, Google Authenticator App or Microsoft Authenticator App).
N.B. this does not apply to amnesty.org, see below.
Setting up two factor authentication:
Your site administrator should first assign you a ‘Subscriber’ User role – this will allow you to log in with limited access to edit and publish content. Once you have set up the two-factor authentication, you can then be assigned to the correct User role (e.g. Author, Contributor, Editor).
As a Subscriber, you can take the following steps to set up your two-factor authentication:
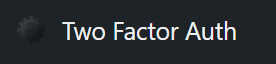
- Log in using your username and password
- Click on Two Factor Auth in the sidebar.
- Add your WordPress account to your authenticator app on your phone by scanning the QR code.
- Select Enabled and then click Save Changes.
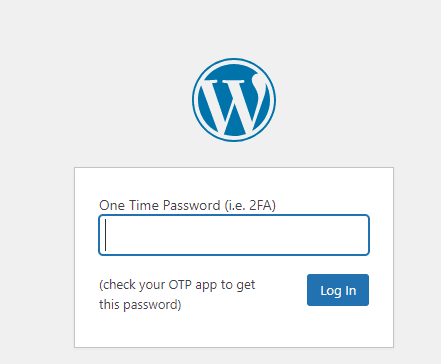
Now, when you log in, there will be two stages:
- Provide your email and password, as before
- Provide the 6-digit code from your authenticator app on your phone
Logging in to amnesty.org (Office365 single sign on)
The Amnesty global website, amnesty.org, is linked to the International Secretariat’s Office 365 Single Sign On system, which includes its own multi-factor authentication. Simply visit www.amnesty.org/wp-admin and you will be taken through the familiar Microsoft login steps.
2. User Profile Settings
To access your profile settings visit [your website]/wp-admin/profile.php. or click the icon in the top right corner when you’re logged in to WordPress:
Language
To change the language in WordPress:
- Go to your profile settings
- Scroll down to Language, in the Personal Options section.
- Pick your chosen language from the drop-down list.
- Scroll right to the end of the page and click Update Profile to save.

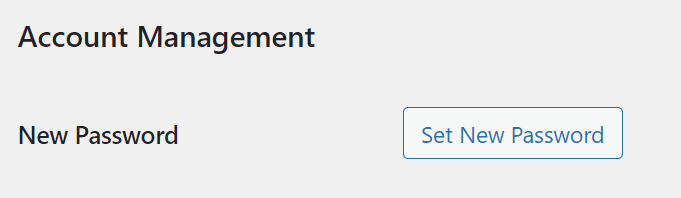
Change your password
To change your password:
- Go to your profile settings
- Scroll down to the Account Management section, under About Yourself
- Click Set new password
- WordPress will suggest a password for you, or you can type in your own
- Scroll right to the end of the page and click Update Profile to save the new password.
*We recommend using a strong password, using at least 10 characters, with a combination of letters, numbers and symbols.
Colour scheme
You may wish to change your WordPress back end colour scheme, especially if you work on several Amnesty websites. This can be a useful way of visually signalling to yourself which site you are working on:
- Go to your profile settings
- Scroll down to Admin Colour Scheme, under Personal Options
- Select your chosen colour scheme.
- Scroll right to the end of the page and click Update Profile to save the colour scheme.

3. Navigating around WordPress
When you log in to WordPress, you will first arrive at the dashboard.
Navigating via the front end
One of the easiest ways to find the content you want to work on is via the front end of the website. To go to the front end:
- Hover your cursor over the website’s name in the toolbar.
- Select Visit Site from the drop-down menu.

You can now navigate around the site as normal. Whilst you are logged in, you will see the WordPress toolbar at the top of the page. When you find the page or post you want to edit, you can select Edit Page, in the toolbar, to enter the WordPress editor:

You can return to the dashboard by hovering over the website’s name in the toolbar and selecting Dashboard from the drop-down list.

Navigating via the back end
You will need use the WordPress back end when you want to create new content or work on a draft that has not yet been published.
Content in WordPress is organized into several different categories, you may see some or all the following options:
Posts and pages
The main difference between the Posts and Pages is that: Pages are evergreen, and Posts are time-stamped.
Petitions
If you are using the Amnesty WordPress Petitions Plugin, you will see Petitions as an additional content type.
Media Library
Media, such as images, videos and PDFs are stored in the Media Library.
You can add these files to your pages and posts directly in the WordPress editor as you are building your post, or you can first upload them to the Media Library.
What is Evergreen vs Time-Stamped Content?
Evergreen content is content that always stays the same. It may need to be updated, for example, once per year, to ensure the content is up to date. But the page itself will always remain there. Examples of evergreen content are:
- Pages within the What We Do section
- About us pages, such as Who We Are
- The Donation page and the Join Page
Time-stamped content is content that is linked to a particular publish date. On amnesty.org, all of the content within the Latest section is time-stamped and is created as Posts.
4. Creating and Publishing Content
Add a new post
To create a new Post:
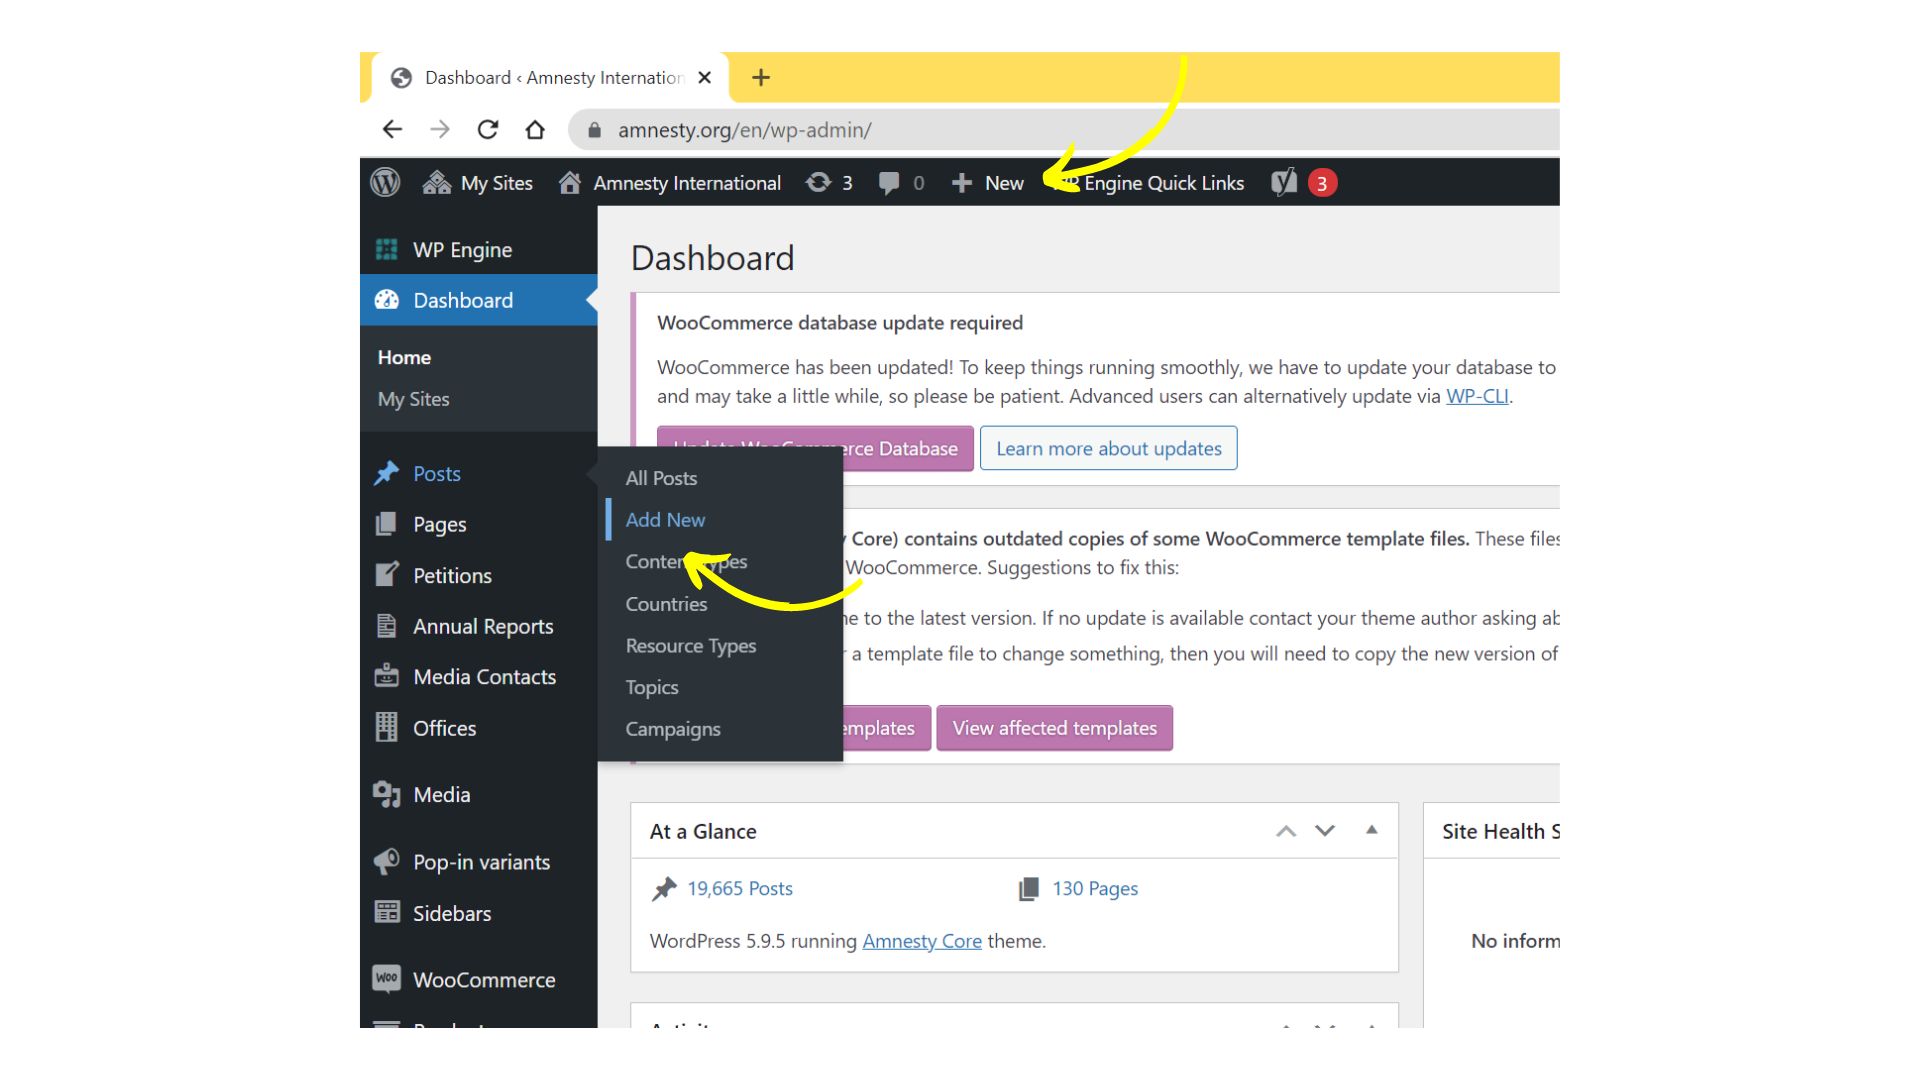
- Hover over New on the toolbar and then select Post, or
- Hover over Posts on the sidebar and then select Add New.
The Gutenberg editor
We use the Gutenberg Editor to create content in WordPress. This is WordPress’s ‘block editor’ that allows users to edit their content using a range of different blocks that can be added, arranged and rearranged on the post or page in a visually intuitive way.
Many of the blocks that we use come from WordPress’s core library of blocks, such as paragraph, heading, list, table, image, video, columns, buttons, separator, social icons.
We also have several content blocks that have been specifically designed as part of Amnesty’s WordPress Theme. You can learn more about Amnesty’s Blocks on the Amnesty WordPress Theme documentation site.
Adding blocks
To add a block in the editor, click on the Block Inserter + . Alternatively, you can type / followed by the name of the block in a new paragraph and press enter. Get detailed instructions on adding blocks.
Post templates
We have two main post templates that we we use for creating posts and pages:
- Standard Post Template
- Component Template
To change the template:
- In the Editor, go to Post settings ⚙️
- Under Template, click on the drop-down list and select the template you want to use:

Standard Post Template
This is the template used for most News posts.
The standard post template includes several key elements that frame the post content, such as:
- Featured image
- Sidebar
- Share icons
- Topic tags
These elements are all managed within the Post settings and the Appearance settings.
The post content is then added in the editor. In most cases, this content will be largely text-based and made up of Paragraph, Heading and QuoteBlock content blocks.
Component Template
The Component Template has a much more flexible design and enables you to use the full width of the page.
However, this means that the Component Template is more difficult to use. Pages using this template need to be carefully designed to ensure there is appropriate spacing, padding and margins around the content.
If you are planning on creating a page using the Component Template – you can get in touch with the Digital Content Coordinator for training and guidance on how to set it up.

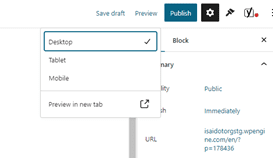
Saving, Previewing and Publishing Content
As you create and edit your content, you will find it useful to periodically preview your page/post to see what it will look like on the front end. You may see differences in the spacing and presentation of your content in the Preview, so it’s important to always check before you publish.
To Preview your post:
- Click Preview
- Select Preview in new tab from the drop-down list
Save a draft
You can always save your Post or Page as a Draft if you are not ready to publish. Simply, click Save Draft and then return to it later.
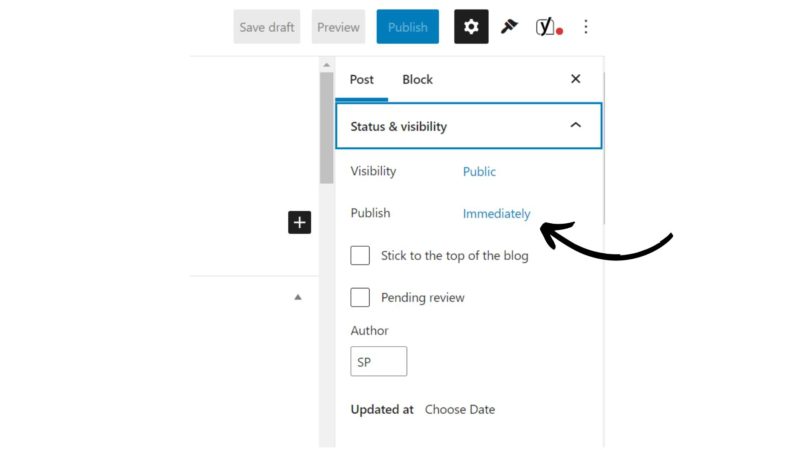
Publish
You can either publish your content immediately or schedule it to be published at a particular time.
If you want to Publish straight away, simply click Publish when you are ready. There will be a pop-up message asking if you are sure you’re ready to publish – click Publish again and the post will be live!
Schedule
To schedule your post to be published at a particular time:
- Click on the word Immediately to bring up the calendar
- Select the time and date you want the post to go live
- Click Schedule
- Click Schedule again to confirm.